Custom Menus in infoRouter Integrating Other Applications Into InfoRouter
This document explains how you can create new menus and menu items in infoRouter that link infoRouter to other applications.
Creating custom menus in infoRouter allow you to call external applications and pass information from within infoRouter. When clicked, infoRouter will pass along a standard set of information wrapped in XML format.
The external application will always get the same information from infoRouter. It is entirely up to the external application to use any or all the information passed along by infoRouter (More on this later in this document).
Here Is How It Works:
At application start-up (infoRouter), infoRouter will check for certain information in the application path. One of the items it looks for is an XML file called “CustomMenus.xml” located in the “Config” folder.
If it does not see this file it will simply assume there are no custom menus and continue. If it does actually find this file, it will attempt to process it for menu definitions.
Here is what it expects to find:
<root>
      <menu name="mnuReports" caption="Reports">
 <menu name="mnuReport1" caption="Report 1" tiptext="Displays Report 1" target="report1"        action="HTTP://iismachine/customapp/report1.aspx" />

<menu name="mnuReport2" caption="Report 2" tiptext="Displays Report 2" target="report2" action="HTTP://iismachine/customapp/report2.aspx" />
  </menu>

<menu name="TOOLS" caption="Link To">
  <menu name="Faxto" caption="Fax to" tiptext="Faxes to the specified fax number" target="_faxto" action="faxto.aspx" />
  </menu>

  </root>
Every custom menu created under an existing infoRouter menu will be placed on the end.Any new root level menu you define will be created as a menu on the right hand side of the standard infoRouter menus.
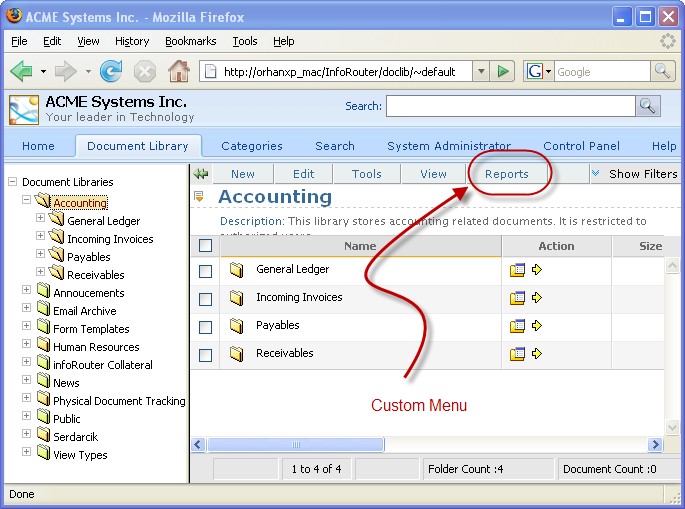
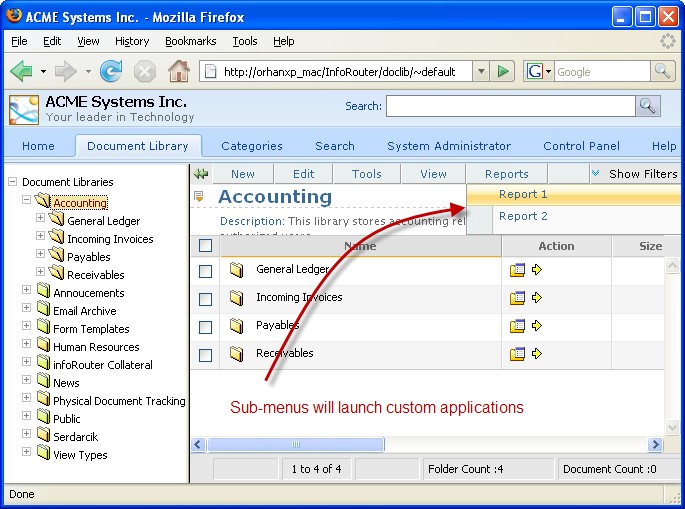
As you can see, the sub-menus appeared below the main menu. When clicked, these sub-menu items will launch external applications.
If you examine the “CustomMenus.xml” example on page 2, you will see that the “Report 1” menu will launch an “aspx” called “Report1.aspx” which is a part of an application called “customapp” which happens to be located on a server called “iismachine”.
Similarly, the “Report 2” menu will launch an aspx called “Report2.aspx” which is a part of an application called “customapp” which also happens to be located on a server called “iismachine”.
Now let’s see what happened to the “Tools” menu.
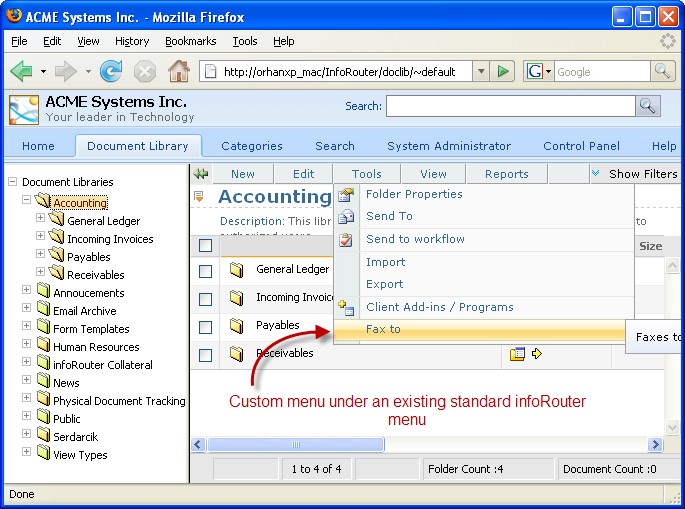
If you examine the “CustomMenus.xml” example on page 2, you will see that the “Fax To” menu will launch the “faxto.aspx”.
As of 8.111, we have added the ability to add custom menus to the pop-up menu.
Here is a sample content you can try:
<root>
<menu name="FILE">
	<menu name="mnuUploadRarFile" caption="Upload RAR File" tiptext="Uploads rar file and Expand it on the server." target="_rarupload" action="UploadRar.aspx" />
	<menu name="mnuCreateImage" caption="Create an Image" tiptext="Create an Image Document using server side image editor." target="_createImage" action="CreateImage.aspx" />
</menu>
<menu name="EDIT">
	<menu name="mnuPackageDocuments" caption="Package Documents" tiptext="Packages the selected documents to download." target="_package" action="PackageDocuments.aspx" />
</menu>
<menu name="TOOLS" caption="test">
	<menu name="mnufaxto" caption="fax test" tiptext="Faxes to the specified fax number" target="_faxto" action="faxto.aspx" />
</menu>
<menu name="Help" caption="Help">
	<menu name="mnuHelpCreateDocument" caption="How to create a document" tiptext="Explains the options of how to create a document" target="_help" action="/help/en/HowtoCreateDocument.htm" />
	<menu name="mnuHelpUpdateDocument" caption="How to Update a document" tiptext="Explains the options of how to update a document" target="_help" action="/help/en/HowtoUpdateDocument.htm" />
	<menu name="mnuHelpWokflow" caption="How to start a workflow " tiptext="Explains the how to submit a document to workflow" target="_help" action="/help/en/Workflow.htm" />
</menu>
<menu name="SAPIntegration" caption="SAP Integration" >
	<menu name="mnuCheckStock" caption="Check Stock" tiptext="Checks stock screen" target="_sap" action="http://sapsrv/checkstock.php" />
	<menu name="mnuCheckCustomer" caption="Check Customer" tiptext="Checks customer screen" target="_sap" action="http://sapsrv/checkcustomer.php" />
	<menu name="mnuCheckInvoice" caption="Check Invoice" tiptext="Checks Invoice screen" target="_sap" action="http://sapsrv/checkInvoice.php" />
	<menu name="mnuCheckShipment" caption="Check Shipments" tiptext="Checks shipment screen" target="_sap" action="http://sapsrv/checkshipments.php" />
	<menu name="mnuReports" caption="Reports" tiptext="Reports screen" target="_sap" action="http://sapsrv/reports.php" />
</menu>
<menu name="POPMENU" >
	<menu name="mnuCustomPopmenu1" caption="My Custom action" tiptext="Some custom action.." target="_newcustompage" action="http://srv1/custompop1.aspx" />
</menu>
</root>
Simply copy the XML code above and paste it into Notepad, then save it under the config folder under the infoRouter application path (e.g. c:\inforouter\config). You must name the file CustomMenus.xml and flush the application cache so that the new settings can be read in by infoRouter.
When a user clicks on one of these custom menus, infoRouter puts together the following information to pass along to the external application:
AuthenticationTicket:
This is the user authentication ticket. It may be used by the external application to call Web Service methods The calls to the web service methods must use this authentication ticket so the call is processed in the security scope of the current user.
WSURL
The WSURL is the infoRouter Web Service URL. This information is passed along to the external application in case the external application needs to call the infoRouter Web Services methods.
Folderid:
This is the current folder id. The external application may need information especially if it needs to place a document into this folder.
Items
This is a string value which stores a list of selected files and folders. Every document and folder is delimited by a pipe character.
Documents start with “D” and folders start with “F”
Sample item string: F1023|F7344|D34834|D32434|D45454
The external application must welcome the call and perhaps capture the information passed by infoRouter with a code snippet similar to the following:
Dim AuthenticationTicket As String = Request.Form("AuthenticationTicket")
Dim WSURL As String = Request.Form("WSURL")
Dim CurrentFolderID As String = Request.Form("folderid")
Dim ReqItems As String = Request.Form("items")